SweetBubbleTrail Guides

Guides to Pop Smarter, Not Harder

A curated library of tactical walkthroughs for Sweet Bubble Shooter. Learn how bubble colours spawn, when to fire boosters, and how to tame the toughest puzzle layouts.

Beginner-friendly overviews Combo & scoring science Booster economy
New here? Start with the Beginner's Guide below. Dive into core mechanics
Start here

Beginner’s Guide to Bubble Matching

Bubble matching in Sweet Bubble Shooter feels simple at a glance, but small positioning choices in the opening levels teach habits that will carry you through late-game gauntlets.

Core matching rules

Every shot follows one foundational rule: connect your fired bubble to a group of two or more matching colours to clear them. Three connected bubbles is the minimum match, but thinking in clusters of four to six bubbles allows you to build combo-friendly shapes.

  • Direct hits: Aim directly at existing same-colour clusters to secure guaranteed clears.
  • Hanging groups: Whenever a cluster is attached by a single stem, match at the stem first to drop the entire group.
  • Ceiling priority: Removing bubbles near the top row can detach full columns below for huge efficiency.

Optimal color pairing in early levels

Early levels are generous with matching colours and wide shot angles. Use this window to learn how colours support each other instead of just clearing the nearest match.

  • Build bridges: Fire a colour into a tight gap so that future shots can connect two separate clusters.
  • Thin the palette: Whenever possible, remove a colour type entirely from the board. Once a colour is gone, it stops spawning, making later decisions simpler.
  • Stack for drops: Look one row above your target. If removing that row will free multiple dangling chains, it is usually better than a larger, isolated clear.

How to approach early levels

Rather than racing the finish line, treat the first 20–30 levels as a live tutorial. Try different shot angles, see how banked shots behave, and notice how often colours repeat. This experimentation creates intuition you can rely on during strict move-limit stages.

When in doubt, follow this order of operations: clear ceiling threats, collapse dangling groups, remove a colour from the pool, then tackle side clutter.

Efficiency

Understanding Move Limits

Move-limited stages turn relaxed bubbling into a resource puzzle. Every shot is a decision: clear now, set up later, or bank a move for emergencies.

How move limits shape each level

In move-limited levels, your remaining shots are more important than the time spent. The layout is often built around forcing you to choose between safe clears and risky setups that can pay off with board-wide drops.

  • Front-loaded pressure: The opening 3–5 shots decide whether the layout opens up or stays cramped.
  • Hidden milestones: Designers often build soft checkpoints—specific sections where, if you have a certain number of moves left, success is very likely.
  • Waste detection: Any shot that only clears one or two bubbles without setting up a second benefit is effectively a wasted move.

Decision-making tips per shot

Before every shot, ask yourself two questions: Can this shot cause a drop? and Will this shot reduce future colour clutter? If the answer to both is no, look for a different angle.

  • Play for two turns ahead: Aim to create shapes where your next bubble, not just your current one, will deliver the big clear.
  • Prefer multi-purpose shots: Shots that both score and open new angles are worth more than slightly larger but isolated clears.
  • Keep a buffer: On tight layouts, mentally reserve 2–3 moves as a safety net for the final rows.

Maximizing efficiency

High-efficiency play comes from removing entire branches instead of nibbling at the tips. Whenever you can collapse a support column or detach a cluster from the ceiling, you are effectively compressing many future moves into one.

Track your success by noting how many bubbles remain at victory. If levels consistently end with several spare moves, try taking more calculated risks to learn where your true efficiency ceiling lies.

Scoring

Scoring High: Maximizing Combo Chains

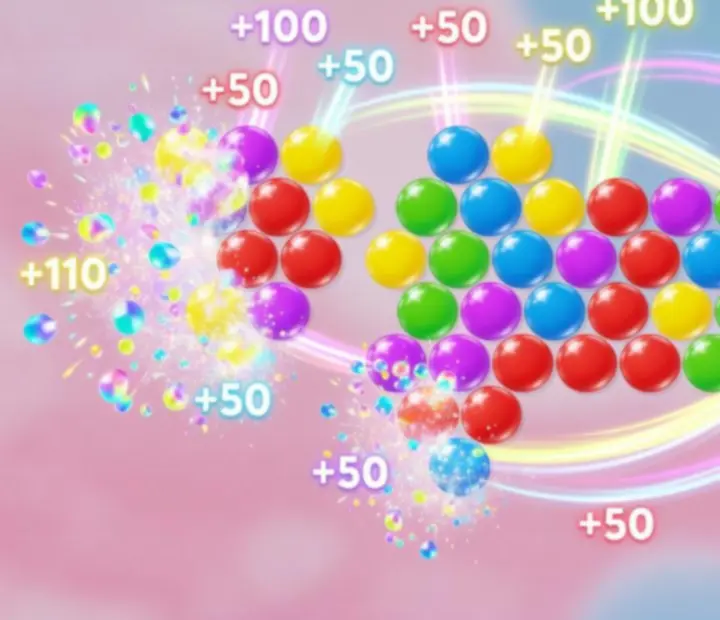
Sweet Bubble Shooter rewards players who think in chains, not single pops. Extended combos amplify your score and often shower you with bonus rewards.

Visual diagram of combo chains and bubble-clearing sequences in Sweet Bubble Shooter
Combo chains thrive on layered clusters and well-timed support shots. The more groups you detach in sequence, the bigger your score spikes.

How the scoring system favors combos

While exact values vary by mode, the scoring model generally grants increasing bonuses for consecutive clears that occur within a short sequence of shots.

  • Chain multipliers: Each successive pop within a chain can apply a rising multiplier to your base score.
  • Drop bonuses: Dropped bubbles often award more points than bubbles cleared directly with the projectile.
  • Overkill padding: Massive final clears can push your score far beyond the minimum needed for three-star ratings.

Setting up reliable combo chains

Combos rarely happen by accident in later stages. Plan your layout so that a single key shot unlocks multiple falling groups.

  • Identify anchor points: Look for tiny stems connecting entire sections to the ceiling. Target these with prepared colours.
  • Pre-build landing pads: Place a bubble so that your next shot can simultaneously match two separate groups, doubling the effect.
  • Combo ladders: Try to leave bubbles stacked vertically so that clearing the top row drops successive layers in a cascade.

Maintaining momentum across levels

Combo play is also about rhythm. If you notice runs where your chains keep stalling at one or two pops, slow down and hunt for bigger anchor clears before spending powerful boosters.

For a deeper breakdown of score chasing and combo-specific level picks, explore the dedicated combos section on SweetBubbleTrail.

Explore combo-focused guides

Obstacles

Level Obstacles Explained

From stubborn blockers to rotating rings of chaos, obstacles are designed to bend your shot planning and force creative angles.

Blockers and shielded bubbles

Blockers typically sit between you and high-value clusters, either absorbing hits or requiring specific matches to clear.

  • Hard blockers: Need direct hits or multiple connections to break. Prioritize them if they lock off large sections of the board.
  • Colour shields: Some bubbles may require matches of a specific colour layer before they can interact with normal rules.
  • Choke points: When blockers narrow a pathway, use bank shots along the walls to bypass them and strike at their supporting bubbles instead.

Spinning bubbles and moving parts

Rotating or shifting obstacles add timing and anticipation to your shots. The goal is to predict where the weak point will be when your bubble lands.

  • Wait for alignment: Shooting at the wrong moment can waste moves. Pause until your desired colour or opening rotates into reach.
  • Target pivots: Some spinning structures rely on a central node. Removing it can collapse the entire formation.
  • Bank around chaos: When rings are too unpredictable, aim at static supports outside the rotation to drop everything at once.

Locked zones and restricted rows

Locked zones may block horizontal travel or prevent access until certain goals are met, like clearing a quota of a specific colour.

  • Fulfil unlock conditions early: If a zone requires a certain number of matches, focus on that objective before the layout becomes cramped.
  • Preserve angles: Avoid clogging the lanes leading into locked zones with low-impact shots.
  • Chain the unlock: Time your unlocking move so that it also triggers drops or sets up a ready-made match beyond the gate.
Boosters

Booster Power-Ups Overview

Boosters are your panic buttons and perfection tools. Using them thoughtfully can turn near-misses into clean, three-star clears.

Demonstration of Rainbow Bubble, Bomb Bubble, and Line Shooter boosters in Sweet Bubble Shooter
Primary boosters—Rainbow Bubble, Bomb Bubble, and Line Shooter—excel in different board states. Save them for layouts where their strengths truly shine.

Rainbow Bubble

The Rainbow Bubble is your wildcard piece, matching any colour it touches to complete a set.

  • Best use: Resolving tight bottlenecks or finishing a long-prepared combo chain.
  • Avoid: Spending it on an easy three-bubble match you could clear with normal shots.
  • Pro tip: Fire Rainbow Bubbles into the anchor of dangling clusters to cause dramatic drops.

Bomb Bubble

The Bomb Bubble clears a small radius around its landing point, breaking through blockers and clearing mixed-colour clutter.

  • Best use: When several colours are knotted together and there is no efficient direct match.
  • Avoid: Firing bombs into empty or low-density zones where their area of effect is wasted.
  • Pro tip: Land bombs near structural supports rather than in the middle of a cluster to trigger cascading drops.

Line Shooter

The Line Shooter slices through a column of bubbles, ignoring colours and carving out entire paths.

  • Best use: Creating emergency channels to the top or cutting through thick blockers.
  • Avoid: Using it on already-open boards where angled shots can reach targets more economically.
  • Pro tip: Align Line Shooters with stems that hold multiple side branches; clearing these can free multiple wings of the board at once.

For extended coverage on booster synergy, including when to pair Rainbow and Bomb bubbles for explosive finales, check our dedicated boosters hub.

Open booster strategy hub

Systems

Color Drop Patterns & Probability

You cannot control which colours appear next, but you can read the pattern and nudge probability in your favour.

How colours enter play

Sweet Bubble Shooter typically draws new bubble colours from the set currently active on the board. As you remove entire colours, they gradually stop appearing in the queue, streamlining your decision space.

  • Board-dependent pool: The game is more likely to serve colours that still exist in the top rows.
  • Soft balancing: Long streaks without a needed colour often end in compensation shots, though not guaranteed.
  • Mode variance: Special events sometimes tweak the colour pool to emphasize particular strategies.

Reading pattern streaks

Instead of waiting passively, watch the last 5–7 bubbles you fired and how the board reacted. Repeated appearances of one colour can signal a temporary bias.

  • Use surplus colours to pre-build paths: If you are flooded with a colour you do not immediately need, stack it to create future bridges rather than firing random clears.
  • Starve unwanted colours: Remove small clusters of an annoying colour whenever it is convenient, so it slowly disappears from the pool.
  • Cluster-then-collapse: Build larger groups of frequently appearing colours near key stems to turn a disadvantage into a huge drop later.

Predictive play for advanced users

Over many runs, you will develop a sense of how likely a needed colour is to show up after you thin the board. Lean into this by preparing flexible shapes that can benefit from two or three different colours, reducing the risk of dead turns.

Probability-savvy play shines in move-limited stages and late-game maps, where every wasted bubble feels punishing.

Challenge

Mastering Hard Levels

Hard levels are designed as skill checks, asking you to combine everything you have learned—angles, probability, and booster discipline—into one focused run.

Reading the level before you shoot

Before taking your first shot, pause for a full scan from ceiling to floor. Identify bottlenecks, locked zones, and the main anchors holding large clusters in place.

  • Mark your win condition: Is the level really asking you to clear everything, or just to free one side or a specific target bubble?
  • Spot your emergency lanes: Note which wall angles will still be open when the board gets crowded.
  • Estimate booster value: Visualize the best possible positions for Rainbow, Bomb, and Line Shooter before you start spending them.

Replay tactics and pattern learning

Failing a hard level a few times is part of the process. Use each run to learn.

  • Track choke points: Where do you consistently run out of moves or space? Build new tactics around that area.
  • Test alternate openings: Try different first and second shots to see how the mid-game layout evolves.
  • Note colour behaviour: Pay attention if certain colours appear more often during specific phases of the level.

Booster economy and mistake recovery

Booster use in hard levels should feel intentional, not reactive. Save them for moments when you can recover from bad luck, not from careless shots.

  • Set a booster budget: Decide how many boosters you are willing to spend on this level before you start.
  • Recovering from misfires: If a shot lands poorly, look for ways to transform the new structure into a future drop opportunity rather than immediately restarting.
  • Know when to reset: If your early shots completely close valuable angles, it is sometimes faster to restart and try a new opening.
Events

Daily Challenges & Events

Daily and weekly challenge modes add refreshing twists to standard play while feeding you boosters, coins, and cosmetic rewards.

Understanding challenge rules

Each event usually tweaks one or two key systems: move limits, obstacle density, or scoring modifiers. Read the rule card carefully before starting, especially when combo multipliers or colour quotas are in effect.

  • Limited attempts: Some challenges cap retries, making consistency more valuable than experimentation.
  • Score targets: Others focus solely on reaching high-score thresholds regardless of leftover moves.
  • Themed layouts: Event boards often showcase specific obstacles, making them great practice for campaign stages.

Tips for limited-time puzzles

Time-limited or attempt-limited events reward careful planning and quick adaptation.

  • Warm up in regular levels: Play a couple of normal stages to get your shot rhythm before jumping into high-stakes challenges.
  • Skip greed plays: When attempts are restricted, favour safe clears over risky but spectacular combos.
  • Observe before committing: If event boards repeat daily with small variations, use the first run as a scouting mission.

Maximizing event rewards

Event rewards often trickle in across multiple tiers, from participation bonuses to high-score milestones.

  • Focus on milestone tiers: Aim for thresholds that grant boosters or coins rather than chasing every last cosmetic reward.
  • Stack with dailies: Combine challenge runs with daily quests when possible to earn overlapping progress.
  • Use rewards strategically: Reserve event boosters for tough campaign bottlenecks instead of spending them back into the same event.
Techniques

Visual Guide: Advanced Bubble Clearing Tactics

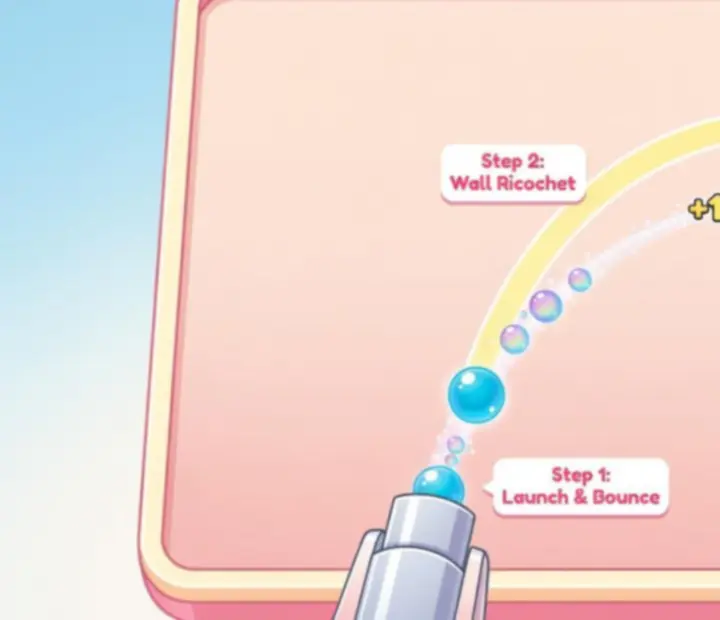
Once basic angles feel natural, advanced shots like wall bounces and bank rebounds unlock new ways to outsmart crowded boards.

Advanced bubble-clearing techniques including wall bounces and bank shots in Sweet Bubble Shooter
Wall angles and bank rebounds let you snake around obstacles to strike at fragile supports. Master these, and even cramped layouts start to open up.

Wall bounces

Wall bounces let you reach behind blockers or tight formations by reflecting shots off the side of the board.

  • Visualize the mirror angle: Imagine the wall as a mirror and trace the line your shot will take after the bounce.
  • Use gentle curves: Extreme angles are harder to control. Aim for slightly oblique bounces when possible.
  • Practice on safe boards: Use early or replayed levels to experiment without pressure.

Trick shots and bubble banks

Trick shots involve grazing edges of clusters or squeezing bubbles into tiny pockets to set up future clears.

  • Edge catches: Clip the side of a group so the bubble sticks in a specific niche, enabling a later match from a fresh angle.
  • Bank rebounds: Intentionally aim so your bubble hits a cluster, then the wall, then another cluster, potentially triggering multiple connections.
  • Safe misfires: When risk is high, plan shots so that even if they land slightly off, they still build a usable structure.

Turning tight layouts into opportunities

On cramped boards, every free tile and angle matters. Advanced techniques help you reclaim those spaces.

  • Create pockets on purpose: Clear small wedges to open new shot lanes instead of always chasing the largest visible match.
  • Target structural weak points: With bank shots, aim for stems and pivots instead of the brightest cluster.
  • Combine with boosters: Use a Bomb or Rainbow Bubble at the end of a bank path for high-risk, high-reward clears.
Economy

Resource Management Tips

Smart resource management means more attempts on tough stages and a healthier stockpile of boosters for late-game walls.

Managing booster stockpiles

Boosters are your most precious resources, and burning through them too early can leave you stranded in advanced worlds.

  • Sort levels by need: Reserve boosters for levels labelled as hard or for stages where you have already learned the layout.
  • Limit retries with boosters: If a booster-assisted run fails twice, take a break and revisit with a new plan instead of brute-forcing.
  • Leverage event rewards: Use event boosters in campaign levels where they cover your weakest skills.

Optimizing coin use

Coins are often used for extra moves, second-chance revives, or direct booster purchases. Over-spending on impulse can slow your long-term progress.

  • Set personal thresholds: Decide in advance when an extra-move purchase is worth it—usually when a win is guaranteed within one or two more shots.
  • Favour bundles over singles: Where possible, spend coins on multi-booster bundles that increase your flexibility.
  • Avoid sinking coins into easy replays: If a level feels beatable with practice, save the currency and refine your play.

Timing your investments

The ideal moment to spend resources is when they unlock a chain of future progress, not just a single victory.

  • Break bottlenecks strategically: Use boosters and coins on levels that gate access to entire new regions on the map.
  • Stack advantages before events: Enter score-boosting events with a modest booster reserve so you can chase milestone rewards efficiently.
  • Keep a safety cushion: Always maintain a small buffer of coins and boosters for unexpected difficulty spikes.
Progression

Level Selector & Progression Map

The level map in Sweet Bubble Shooter is more than a pretty trail—it is a guide to pacing, checkpoints, and future content.

Reading the progression map

The map usually winds through themed regions, with clusters of standard levels punctuated by challenge stages or special encounters.

  • Region themes: Each area tends to emphasize specific obstacles or colour distributions.
  • Difficulty ramps: Expect a gentle incline in difficulty followed by a spike around key milestones.
  • Visual foreshadowing: New obstacle types sometimes appear in the background before they debut in stages.

Checkpoint usage

Checkpoints on the map can serve as mental rest stops, letting you regroup resources and adjust your strategy.

  • Review your toolkit: Before entering a new region, check your booster and coin totals.
  • Revisit older levels: Replay earlier stages for practice and bonus rewards if you are stuck.
  • Plan your sessions: Use checkpoints as natural stopping points to avoid fatigue-driven mistakes.

Unlocking future content

Some modes, events, or side paths may unlock only after you reach certain map positions or complete optional objectives.

  • Watch for side trails: Optional routes can contain easier levels or unique rewards that strengthen your main run.
  • Time-limited branches: Events may temporarily attach to specific regions, encouraging you to push there sooner.
  • Sync map progress with downloads: If you play across multiple platforms, ensure your progress is saved so you can swap devices without losing your trail.
Help

Troubleshooting & Frequently Asked Questions

Stuck on a level, seeing odd shots, or worried about losing progress? This section addresses the most common Sweet Bubble Shooter frustrations.

Gameplay issues

Why did a match not register when the colours looked correct?
Most non-registering shots come from bubbles connecting at a diagonal or barely grazing the cluster. Only direct, edge-to-edge contacts count. Try adjusting your aim so the bubble seats firmly into the group rather than clipping the side.
My shots feel slightly delayed. What can I do?
Input delay is often related to device performance or background apps. Close other applications, lower visual settings if available, and ensure your device has enough battery and storage. If the issue persists on PC, check for running downloads or heavy background processes.
The level reset even though I still had moves left. Is that normal?
Some special modes end the level when their unique objective is met, even if you still have moves available. In standard stages, unexpected resets may indicate a connectivity issue or app restart. Make sure your game is updated to the latest version via your store.

Progress and accounts

How can I avoid losing my progress?
Whenever possible, link your game to a platform account or cloud save option offered in the settings. This is especially important if you switch between mobile and PC builds.
Can I replay old levels without affecting my map?
Yes. Replaying earlier stages is a great way to practice advanced shots, chase higher scores, or farm small rewards. Your furthest level unlocked stays available.

Still need help?

If your issue is not listed here, you can reach out to the SweetBubbleTrail editorial team. While we are not the official game support, we can often point you toward helpful resources or advanced strategies.

Contact SweetBubbleTrail

Ready to try these tactics in Sweet Bubble Shooter?

Take your new knowledge straight into the game. Download on your favourite platform and start popping smarter today.